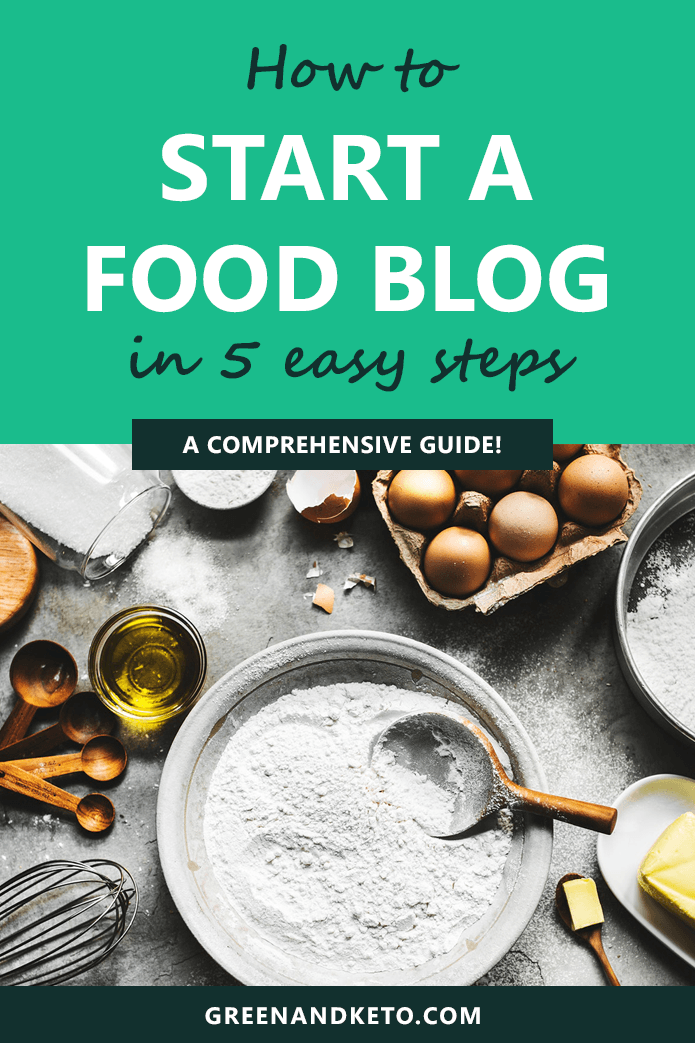
Are you thinking about starting a food blog?
Maybe your friends and family are always asking for your recipes. Maybe you’ve been told dozens of times you need to start a blog!
Does that sound like you? If so, keep reading.

Starting a blog can be fun, fulfilling, empowering! Let me tell you, blogging has been the best job I’ve ever had! It’s allowed me to turn my passion into a career — and support my family while working from home.
I know that “starting a blog” sounds time-consuming, complicated, and techy. But really, it’s not too hard. If you have 15 minutes and can follow 5 simple steps, you can do it, too.
So, I thought it would be helpful to create a resource page that new bloggers can use to see the products and services that I use with my blog.
How to Start A Blog
When I started blogging, I didn’t really know where to begin. I wish I’d had a step-by-step guide like this one to walk me through each step.
So hey, if you need help getting started, I’m here for ya.
Whether you’re just thinking about starting a blog — or what to upgrade your existing blog – you can use my experience to jump-start your blog journey.
And, don’t miss the other resources at the bottom of this post for tips on growing a successful blog.
A note before we get started: This page contains affiliate links. Please know that I only recommend products and services that I have used. Each resource listed here is something I chose after doing plenty of research.
5 Steps to Starting a Food Blog
First of all, what is a blog and why would you want to start one?
In simple terms, a blog is a type of website with posts (articles or recipes) displayed in reverse chronological order. In other words, the most recent posts are at the top.
There are many reasons to start a blog. You may want to share your story, connect with other people, establish yourself as an authority in your field, or make money while working from own.
I started this blog — greenandketo.com — to share delicious recipes with people interested in living a healthy lifestyle. And now, what started out as a hobby has become my full-time income.
Here is brief rundown of the steps you’ll take to start your blog:
- Choose a topic
- Choose a platform
- Design your blog
- Write great content
- Build a community
And then, after you have the technical steps completed, you might want to learn more about these blogging topics:
- Improve food photography
- Grow an email list
- Learn even more about blogging
Alright, let’s get started!

Step 1: Choose a Topic and Register a Domain Name
If you’re reading this post, you might have a general idea of what you want to blog about. Maybe you already have a focused niche and a name — that’s great!
Choose a topic.
When you start your own blog, you have the flexibility to write about any topic you choose. I recommend choosing a niche topic that:
- is something you enjoy and are excited about.
- is broad enough that you can come up with plenty of blog post ideas.
- is narrow enough that you can establish yourself as a go-to expert.
If your topic is too broad, it will be hard to stand out. If your topic is too narrow, it will be hard to find a lot of readers.
Register a domain name.
The next thing you’ll want to do is pick a domain name for your blog — otherwise known as your URL.
Your domain name is your web address. For example, greenandketo.com is my domain name.
It’s best to think of a domain name that gives your readers an idea of what your blog is about. Good domain names are:
- Easy to spell and pronounce
- Descriptive
- Memorable
- Not too long
Don’t choose a domain with intentional spelling mistakes. A domain name ending in “.com” is best. And don’t use hyphens if possible.
Tip: Put some thought into choosing a domain name. A domain is essentially your brand name, and it’s not easy to change once you’ve become an established blogger.
Once you’ve thought of some potential domain names, head to Bluehost to see if your domain name is available. Or, use the search box below.
You’ll also want to make sure that all of the corresponding social media handles are available. At the bare minimum, make sure that you claim a matching Instagram handle.
Bonus tip: If you also register for hosting from Bluehost (see step #2 below), you can get your domain for free.
Step 2: Choose a Platform and a Hosting Company
The next step is the choose your blogging platform and your hosting company.
A blogging platform — like Wordpress or Blogger — is software that manages your content and helps you publish posts. A hosting company — like Bluehost — makes your content accessible online.
The best combination (that I’ve used and paid for) is a Wordpress blog hosted by a hosting company like Bluehost.
You may be wondering, can you blog with a free service like Blogger? And the short answer is sure, you could. But free services are never going to be as flexible or powerful as your own WordPress blog.
In fact, the only setup I recommend is a WordPress blog hosted by a company like Bluehost. In my experience, it is the absolute best option for beginners. It is incredibly affordable (less than $10/month) and the support is outstanding. They will help get WordPress installed on your domain and you’ll be ready to go!
You’ll also get a discount if you use the links below (and I’ll get a commission because they are my referral links). It’s simple to set up and there’s a money-back guarantee.
Click here to go to Bluehost and hit the green “Get Started” button.
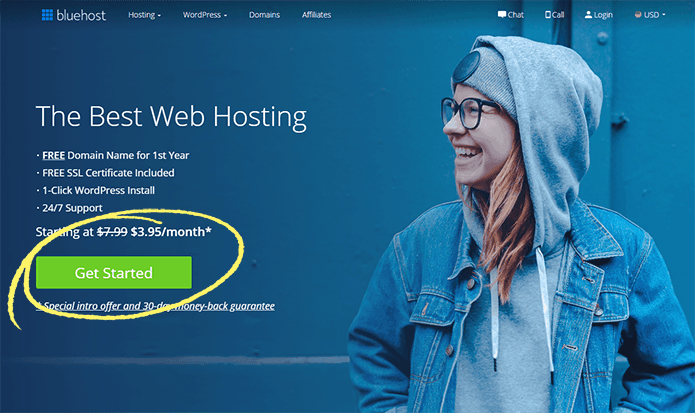
First, head to Bluehost.com and click the green “Get Started” button.

Next, choose a plan by clicking a green “Select” button.
Either the Plus plan or the Choice Plus plan is okay. But, I recommend the Choice Plus plan because it’s got more unlimited features and includes free Domain Privacy. Domain privacy is important because it keeps your personal contact information hidden from the public.
Reminder from above – if you purchase a Bluehost hosting plan, then you get your first domain for free.
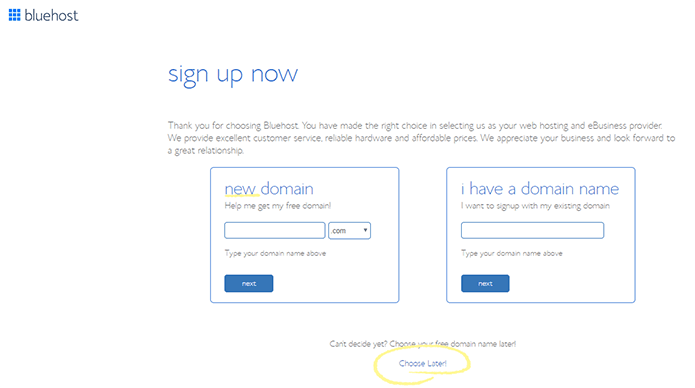
If you haven’t registered a domain name yet, enter your desired domain name in the “new domain” box.
If you have already registered a domain name that you’d like to use for this new site, enter it in the “I have a domain name” box.
And, if you’re not sure about your domain name just yet, click the “Choose Later” link at the bottom of the page.
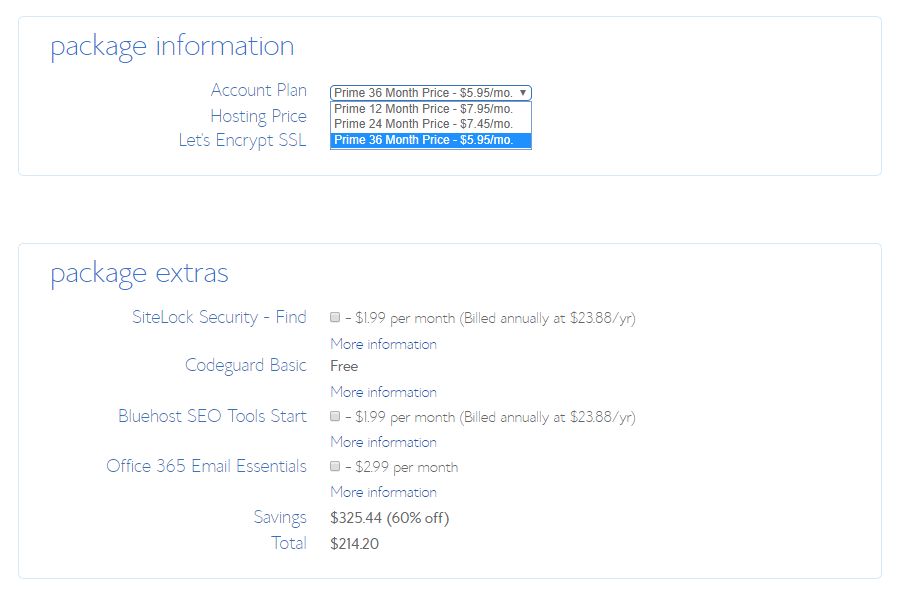
On the next page, you’ll enter your account information and select your package plan. Tip: The discount pricing they offer to new customers applies to the first payment only. If you choose the 36-month plan, you can keep the introductory pricing for 3 years. So, I recommend choosing the longest plan that your budget allows.
You can skip the package extras if you want, though I recommend purchasing Domain Privacy. (If you chose the Choice Plus plan on the previous screen, Domain Privacy will be included for free.)
Complete the purchase, set a password, and log in to your Bluehost account.
Congratulations, you are the proud owner of your own website!
Bluehost will automatically install and set up WordPress for you. If you have followed the above guide and purchased hosting and a free domain name from Bluehost, it will start installing WordPress for you automatically.
Installing WordPress Manually on Bluehost
Now, if for some reason you deleted your existing WordPress installation or want to install WordPress on a new domain (Addon domain), you can follow these steps. To install WordPress, first make sure you are logged in to your Bluehost Hosting account. Then,
- Open the My Sites tab from the side menu on the left.
- Click on the Create Site button.
- Enter the Site Name and Site Tagline. Click Next.
- Select the domain you wish to install to from the drop-down list.
- Choose the directory this should be installed to, and click Next.
Step 3: Design your WordPress Blog with Themes and Plugins
Woohoo! At this point, you officially have your own food blog! Check your email for your WordPress login information, if you don’t already have it.
When you log in to your WordPress site, the first thing you will see is your Dashboard. This is the admin side of your WordPress blog. From here, you’ll write and publish your blog posts, add photos, and manage comments.
Configure Your WordPress Settings
Before publishing anything on your blog, I highly recommend making some small changes to your WordPress settings.
- Change your site title and tagline to reflect your blog name. (in Settings –> General)
- Change your permalinks. Most people choose to remove the date from their permalinks. (in Settings –> Permalinks)
- Remove the demo content. There might be some pre-installed plugins that you don’t want. There is also a “Sample Page” and a “Hello World” post that you will want to delete.
Install Important WordPress Plugins
There are a few plugins that I would recommend installing right away. These are the WordPress plugins I’ve used and loved.
- Yoast – A plugin to help with SEO
- Akismet – Protects your blog from spam and filters spam comments.
- A recipe card – A recipe card plugin helps to format and display custom recipe cards. It also helps sites like Google and Pinterest better understand your recipes. There are two recipes cards I recommend: Tasty Recipes or Create by Mediavine
- A Pinterest plugin, like Tasty Pins that will optimize your images for both Pinterest and SEO
- reSmush.it – Food blogs have a lot of photos, and a lot of large photos in your post can make your blog load slowly. To help, use a plugin like reSmush.it that optimizes images automatically and make your website load faster.
To install plugins from your WordPress Dashboard, go to Plugins –> Add New. Enter the name of a plugin in the search bar in the top right.
Find the plugin in the search results and click “Install Now.” Once it’s installed, click Activate. Once it’s activated, you can configure a plugin’s settings if needed.
Install a WordPress Theme
Now that you have your plugins set up, you may want to change your blog’s design. In WordPress, you can change the design by installing a theme.
Think of it this way: If WordPress is the engine of a car, the theme is the coat of paint.
If you want a beautiful theme that works right out of the box, I recommend purchasing a premium theme like the Genesis theme. Premium themes are usually better maintained and offer customer support. (Like anything else, you get what you pay for!)
The Genesis Framework by StudioPress.com is an incredibly popular theme among food bloggers. StudioPress offers “child themes” that are designed to be used by food blogs in particular. Some of these child themes include
If you do decide to go with the Genesis Framework, don’t miss this Genesis Guide for Absolute Beginners.
If a premium theme isn’t in your budget right now, don’t worry. There are so! many! free WordPress themes to choose from.
If you want a free theme, I recommend GeneratePress. GeneratePress comes with a lot of customization options. Later on, you can upgrade to the premium version to access even more customization options and add-ons.

Step 4: Create Great Content for Your Blog.
Now to get down to the fun part: writing posts and recipes for your blog!
Your WordPress blog is made up of two types of pages: Posts and Pages.
Posts are what we usually think about when we talk about blogging. These are the individual articles or recipes that you publish frequently — like once or twice a week.
Pages, on the other hand, contain more static or permanent information. I recommend setting up a few pages to start, including:
- About page
- Contact page
- Privacy Policy page
How to Write a Great Recipe Post
Writing a great recipe blog post starts with a great recipe. But there is more to it than that, of course.
A post on your food blog will likely have several paragraphs of written content to describe and explain the recipe. And you’ll want to include a few drool-worthy photos to show your readers just how delicious the recipe will be.
Here are some ideas to include in your next food blog post:
- the story behind the recipe
- tips for how to make the recipe turn out just right
- process photos
- a description of how you did each specific step
- photos of the finished dish
- a description of the specific ingredients you recommend
- a description of the flavors of the finished dish
- a formatted recipe with measured ingredients and preparation instructions
- links to related recipes
How to Improve Your Food Photography
The food photos in your recipe posts are so important to the success of your blog. And the best way to take great food photos is to take a lot of food photos — aka practice makes perfect!
While I’m not a professional food photographer, my food photos have improved with lots of practice, and a little help from photography and e-books.
My top tips for better food photos include:
- Find great light — natural window light is great, but artificial studio lights are wonderful!
- Use a tripod!
- Edit your photos in Lightroom
If you’re looking for help improving your food photo game, here are my recommendations:
Tasty Food Photography – This book is packed with technical, lighting, and editing tips that will seriously up-level your food photos.
I’d also highly recommend editing your photos in a program like Adobe Lightroom.
How Often to Post on Your Food Blog
When you start your own food blog, your posting schedule is entirely up to you. It will depend on the amount of time you have to devote to your blog.
Don’t stress about posting every day. Find a schedule that feels manageable— like once or twice a week — and stay as consistent as you can.
In the end, it’s better to produce quality content that you are excited to share with your readers.
Step 5: Build Traffic and a Community of Readers
The number one thing you can do to attract a community of loyal readers is to publish excellent quality content on a consistent basis.
Great content gets shared on social media. Great content gets ranked by Google. Great content saved on Pinterest.
Using Social Media to Promote Your Blog
That said, you can also use social media sites like Instagram, Facebook, and Pinterest to promote your blog content.
You can use these channels to connect with your followers and readers, as well as other food bloggers and brands.
Like I mentioned above, one of the first things you should do after securing your domain name is to set up matching accounts on the major social media networks. At the very least, I would sign up for Pinterest, Instagram, a Facebook business page, and Twitter.
If I had to pick one to focus on, it would be promotion through Pinterest. Pinterest is hands down my favorite way to reach new readers. It’s a visual search engine where people go to discover new recipes and ideas.
Instagram can be a great way to promote your food blog as well. Instagram is extremely visual, so eye-catching photos will go far to help you to gain an audience there.
Facebook used to be a great resource for getting traffic. With their algorithm changes over the past year, it’s getting harder and harder to reach your potential readers — but it’s still worth it to create a business page at the very least.
Scheduling Social Media Posts
With all of the different platforms, managing the social media for your blog can be overwhelming. That’s why I love to use a social media scheduler to make it as easy as possible.
Tailwind is the best tool I’ve found for scheduling my Pinterest pins and Instagram posts. It helps you find your readers by automatically optimizing your Pinterest and Instagram schedules based on when your audience is most engaged. And what’s more, Tailwind offers analytics and insights so you can see what’s working and what’s not. (Seriously, if you can only afford one more service, get this one!)
More about Food Blogging
The next step? Learn how to Monetize Your Food Blog!
You can learn even more about food blogging in books, podcasts, courses, and memberships.
My top resource to learn about all things related to food blogging is Food Blogger Pro.
I love the Food Blogger Pro podcast and learned so much from the Food Blogger Pro membership site.
Food Blogger Pro is a central location for people that want to learn how to start and grow a food blog. It’s a membership site with a huge library of resources, for both beginner and intermediate bloggers.
I hope you’ll check it out! And don’t forget, you can get your free domain today when you sign up for hosting with Bluehost!